Anatomy of a blog site
The Anatomy of a blog website
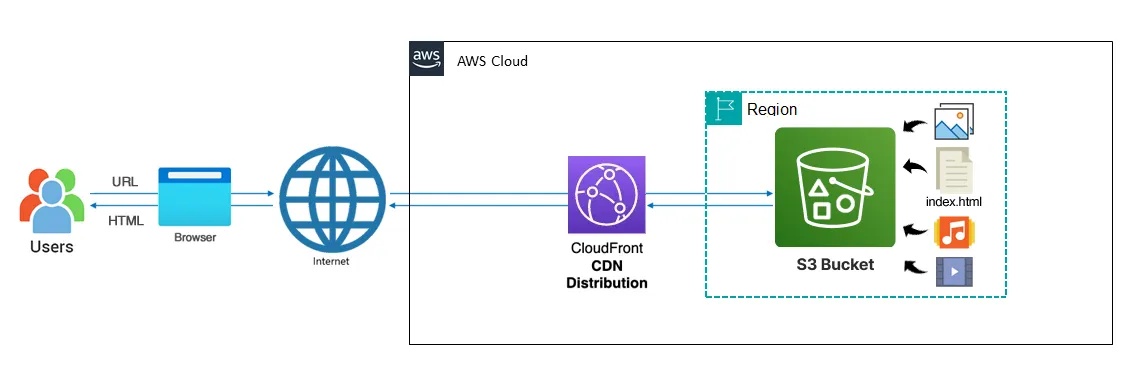
The anatomy of a static website on AWS is a serverless architecture built on several core services, most commonly:
- Amazon S3
- Amazon CloudFront
- AWS Certificate Manager (ACM)
- Amazon Route 53.
This approach offers scalability, reliability, and security without the need to manage any web servers.
Core components
Amazon S3 (Simple Storage Service) This is the central storage location for all your website files, including HTML, CSS, JavaScript, images, and videos. Static website hosting: You configure an S3 bucket with your website files and enable the “Static website hosting” feature in the bucket properties. This designates an index document (e.g., index.html) and an optional error document (e.g., error.html). Public read access: A bucket policy must be configured to grant public read access to the bucket’s objects, allowing the public to view your website. For a more secure setup, this access is often restricted so that only a CloudFront distribution can access the content. Redundancy and durability: S3 automatically replicates your content across multiple data centers, ensuring high availability and 99.999999999% durability.
Amazon CloudFront (Content Delivery Network) CloudFront is the primary public-facing component that delivers your website content to users with low latency.
- Global distribution: It uses a global network of “edge locations” to cache your website content closer to your users, drastically reducing page load times.
- Secure access: The CloudFront distribution acts as a secure intermediary between the user and your S3 bucket. You can use an Origin Access Control (OAC) to prevent users from accessing the S3 bucket directly, forcing all traffic through CloudFront.
- HTTPS encryption: CloudFront secures your website with an SSL/TLS certificate managed by AWS Certificate Manager.
- Performance optimization: With advanced caching controls, CloudFront can further speed up delivery and reduce the load on your origin.
AWS Certificate Manager (ACM) ACM is used to provision, manage, and deploy free public SSL/TLS certificates for your website. Secure connections: It enables your CloudFront distribution to serve content over a secure HTTPS connection. Automatic renewal: ACM automatically handles certificate renewals, eliminating the manual effort of purchasing and uploading new certificates.
Amazon Route 53 (DNS Service) Route 53 is a highly available and scalable Domain Name System (DNS) web service.
Custom domains: It is used to point your custom domain name (e.g., www.example.com) to your CloudFront distribution.
Alias records: You can create an Alias record for your root domain (e.g., example.com) and point it to the CloudFront distribution. This allows for both the root and www subdomains to be accessible.
Hosted zone: You must create a hosted zone in Route 53 for your domain to manage its DNS records.
The request flow
DNS lookup: A user enters your custom domain (www.example.com) into their browser. Route 53, your DNS provider, resolves the domain to the CNAME of your CloudFront distribution. Edge location: The browser makes a request to the nearest CloudFront edge location.
Content delivery (cache hit): If the requested content is already in the edge location’s cache, CloudFront delivers it instantly to the user.
Content delivery (cache miss): If the content is not in the cache, CloudFront retrieves it from the S3 bucket, caches it, and then delivers it to the user. CloudFront handles the secure communication with S3 using OAC.
Secure connection: The entire process is secured via the HTTPS connection managed by the ACM certificate on the CloudFront distribution.
Benefits of this architecture
Scalability: The architecture scales automatically to handle sudden spikes in traffic without manual intervention.
Low cost: It uses a “pay-as-you-go” model with no minimum charges. Since there are no servers, costs are minimal for small sites.
Performance: The use of CloudFront delivers content quickly to a global audience, reducing latency and improving the user experience.
Security: ACM provides free SSL/TLS certificates, and OAC protects your S3 bucket, preventing direct access to your origin data.
Reliability: S3 is designed for high availability and durability. If one data center has issues, the website will still be served from another.
S3 and CloudFront Work Together
Deploying a static webserver on AWS using Amazon S3 and CloudFront is a common, cost-effective, and highly scalable solution. S3 provides durable storage for your website files, while CloudFront acts as a Content Delivery Network (CDN) to accelerate content delivery globally and add a layer of security.
Architecture
Amazon S3: Your static files (HTML, CSS, JavaScript, images) are stored in an S3 bucket, which serves as the origin for CloudFront.
Amazon CloudFront: This service caches your website’s content at edge locations worldwide. When a user requests your site, CloudFront delivers the cached content from the nearest edge location, which dramatically reduces latency.
Origin Access Control (OAC): Instead of making the S3 bucket public, OAC ensures that CloudFront is the only service that can access the files. This is a best practice for security.
AWS Certificate Manager (ACM): To serve your site securely over HTTPS with a custom domain name (e.g., www.example.com), you use ACM to provision a free SSL/TLS certificate.
Amazon Route 53: This DNS service is used to route traffic from your custom domain name to your CloudFront distribution.
Benefits of using CloudFront
Using CloudFront with S3 offers significant advantages over serving files directly from an S3 bucket endpoint.
- Improved Performance: Content is cached at a global network of edge locations, providing faster load times for users regardless of their geographic location.
- Enhanced Security: CloudFront allows you to serve your website over HTTPS with a custom domain and offers built-in protections against DDoS attacks.
- Lower Costs: CloudFront’s data egress costs are often lower than S3’s.
- Custom Domain with SSL: Unlike a public S3 bucket endpoint, which only supports HTTP, a CloudFront distribution can serve your custom domain over HTTPS.
How to deploy: A step-by-step guide
Step 1: Create an S3 bucket Navigate to the S3 service in the AWS Management Console and choose Create bucket. Give your bucket a globally unique name. It’s a best practice to name it the same as your domain (e.g., www.example.com). Choose a region for your bucket. Crucially, keep “Block all public access” enabled for a secure configuration. You will use OAC to grant CloudFront access later. Click Create bucket.
Step 2: Upload your website content Open your new S3 bucket. Upload your static website files (HTML, CSS, JavaScript, etc.) by clicking the Upload button. Ensure your main landing page is named index.html.
Step 3: Create an SSL/TLS certificate Navigate to the AWS Certificate Manager (ACM) service. Request a new public certificate for your domain name (e.g., www.example.com). Follow the steps to validate your domain ownership, typically by creating CNAME records in Route 53 or with your domain registrar.
Step 4: Create a CloudFront distribution Go to the CloudFront service and choose Create Distribution. In the Origin domain field, select your S3 bucket from the dropdown list. For Origin access, select Origin access control settings (recommended). Click Create control setting and follow the prompts to create one. In the Bucket policy section that appears, click Copy policy to update your S3 bucket permissions automatically. Set the Viewer protocol policy to Redirect HTTP to HTTPS. Under Alternate domain name (CNAME), enter your custom domain name (e.g., www.example.com). Select the Custom SSL certificate option and choose the certificate you created in ACM. For Default root object, enter index.html. Click Create distribution. It may take several minutes to deploy.
Step 5: Update your DNS records with Route 53 Once the CloudFront distribution is deployed, find its Distribution domain name (e.g., d12345abcdef.cloudfront.net) in the CloudFront console. In Route 53, create or edit your hosted zone for your domain. Create an A record with an Alias pointing to your new CloudFront distribution. This ensures that traffic to your custom domain is routed to CloudFront.
Step 6: Test your website Wait a few minutes for the DNS changes to propagate. Enter your custom domain name (e.g., https://www.example.com) into your browser to confirm that your static website is working and secured with HTTPS.
Getting to VFS NYC

Resources & References
NSM Lawyers

Contact Information:
Phone: +351 215 847 264
Email: geral@nsmadvogados.pt
Visit: www.nsmadvogados.pt
Address: Av. Fontes Pereira de Melo, 21, 2º 1050 116 Lisboa
Outbound Migration Consultancy

Contact Information:
click here to request free 30 minute consult
Email: planb@outboundmigration.com
Visit: outboundmigration.com
USA
Phone: +1 424 404 9399
Address: 8383 Wilshire Blvd. Ste 800 Beverly Hills, CA 90211
Canada
Phone: +1 604 200 3560
Address: 230-1290 Howe St Vancouver, BC V6Z0C2
VFS.Global
Contact Information:
Visit: VFS.Global
VFS Global application centers
Houston: 1001 Texas Avenue, Suite 1020, Houston, TX 77002.
Miami: 2655 S. Le Jeune Rd, Penthouse 1A, Coral Gables, FL 33134.
New York: 128 E. 32nd Street, 3rd Floor, New York, NY 10016.
San Francisco: 642 Harrison Street, Suite 200, San Francisco, CA 94107.
Washington D.C.: 1025 Vermont Ave NW, Suite 200, Washington, DC 20005.
Have questions or want to share your own sysadmin story? Leave a comment below!
(I will set up comments eventually ;)